The Arduino environment uses a USB cable to provide power the small boards, and also provide for a serial link to load 'sketches' (programs) as well as potentially monitor them via Serial.print() statements. When designing the controller I had to consider how to replicate this environment I could have taken the Arduino approach placing a USB port on that board. But that had two issues:
- The USB port would only be used during config / debug.
- As tough as those INA-220's were to solder, forget about hand soldering an Atmega16u2! (let alone sourcing one with the appropriate Arduino firmware)
The answer was to place a 5-pin header, label it 'service' and when needed plug in a small USB to Serial converter. These are readily available, and often only $2-$3. Look on Ebay.com for "CP2102" based USB to Serial adapters. And make sure you get one with the extra holes along the sides like the photo to the left.
But there is a problem with using these low cost devices, is there not always... The Arduino uses the DTR pin to drive the Reset button to the Amtel. This is needed to get the Amtel / boot loader to search and see if someone is trying to communicate to it via the Serial port, and if so perhaps download a new 'sketch'. And most all the common USB to Serial converts do not bring out DTR. You can see on the Top Pin the one I purchased is labeled RTS. This is actually a Reset line INTO the USB-Serial converter.
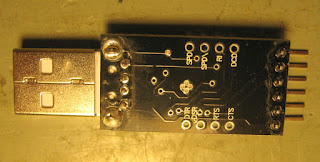
However, flipping it over one can see the vendor has conveniently brought out all the rest of the common 'RS-232' singles (not really RS-232, the singles are there, but the voltage levels are TTL). And even labeled them. (This is why you need to make sure to purchase a board with the extra holes along the edges)
 |
| DTR is right there on the lower left edge hole. |
All that needs to be done is cut the existing RST trace, and bring a jumper down from the DTR signal to the new free pin.
 |
| On mine, this was the trace to cut to free up the 5th pin. |
 |
| Modified China USB to Serial adapter for use with Arduino type boards. |
That is it. I added some hot-glue to protect the new jumper wire. Here you can see it in action, works just fine. (Note I am using the Arduino Uno for its +5v power to power the controller board). External USB to Serial adapter that is compatible with the Arduino development environment for under $3. And if you do not want to do some cutting and soldering, you can purchase a different serial to USB adapter that is already designed to support the Arduino at: www.sparkfun.com/products/9893 It runs $16, plus postage.


No comments:
Post a Comment